#include <qpe/qpeapplication.h>   // 使用するクラスを指定する

#include "mainwindow.h"   // 使用するプログラムを指定する

int main(int argc, char *argv[])
{
	QPEApplication a(argc,argv);
	Mainwindow *mw = new Mainwindow();
	a.showMainWidget(mw);
	return a.exec();
}
#ifndef MAINWINDOW_H
#define MAINWINDOW_H

#include <qmainwindow.h>   // 使用するクラスを指定する
#include <qapplication.h>
#include <qtextcodec.h>
#include <qfont.h>
#include <qmenubar.h>
#include <qcombobox.h>
#include <qlabel.h>
#include <qpushbutton.h>
#include <qpixmap.h>

class Mainwindow : public QWidget{
	Q_OBJECT

public:
	Mainwindow(QWidget *parent = 0, const char *name = 0);

private:
	QTextCodec *codec; // テキストコーデック
	QMenuBar *menubar; // メニューバー
	QComboBox *pen_type, *bar_type, *c_type, *bg_type; // コンボボックス
	QPushButton *erase, *color, *bgcolor;
	QPixmap fm_pen, fm_line, fm_rightangle, fm_rectangle, fm_paintrectangle, fm_eraser, fm_stamp, fm_range, fm_thickline, fm_normalline, fm_thinline, fm_paint, fm_minieraser;

private slots :
	void slot_setPen();
};

#endif //MAINWINDOW_H
#include "mainwindow.h" // mainwindow.cpp のヘッダーファイル mainwindow.h を読み込み
Mainwindow::Mainwindow(QWidget *parent, const char *name)
: QWidget(parent, name)
{
// テキストコーデック「codec」を作成
// 以降、codec->toUnicode("ここに書いたことは日本語で表示できる")
codec = QTextCodec::codecForName("ShiftJIS");
// ウィンドウのタイトルを設定
setCaption(codec->toUnicode("サンプル11「ツールバーを配置する」"));
// 使用するフォントを設定
QFont f("lcfont",18);
setFont(f);
QLabel *ql = new QLabel(this);
ql -> setBackgroundColor(QColor::QColor( 100, 150, 200 ) );
ql -> setGeometry(0,0,640,70);
// 描画のタイプの画像ロード
fm_pen.load("/mnt/card/fm_pen.jpg");
fm_line.load("/mnt/card/fm_line.jpg");
fm_rightangle.load("/mnt/card/fm_rightangle.jpg");
fm_rectangle.load("/mnt/card/fm_rectangle.jpg");
fm_paintrectangle.load("/mnt/card/fm_paintrectangle.jpg");
fm_eraser.load("/mnt/card/fm_eraser.jpg");
fm_stamp.load("/mnt/card/fm_stamp.jpg");
fm_range.load("/mnt/card/fm_range.jpg");
// 直線のタイプの画像ロード
fm_thickline.load("/mnt/card/fm_thickline.jpg");
fm_normalline.load("/mnt/card/fm_normalline.jpg");
fm_thinline.load("/mnt/card/fm_thinline.jpg");
// ぬりつぶし四角のタイプの画像ロード
fm_paint.load("/mnt/card/fm_paint.jpg");
// 消ゴムのタイプの画像ロード
fm_minieraser.load("/mnt/card/fm_minieraser.jpg");
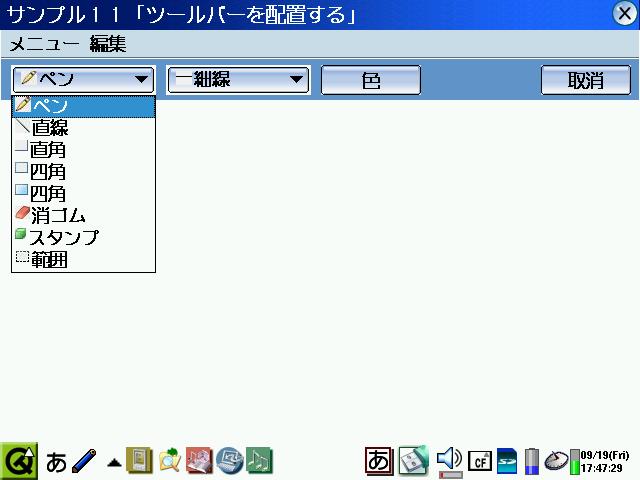
pen_type = new QComboBox( this );
pen_type -> insertItem(fm_pen, codec->toUnicode("ペン"));
pen_type -> insertItem(fm_line, codec->toUnicode("直線"));
pen_type -> insertItem(fm_rightangle, codec->toUnicode("直角"));
pen_type -> insertItem(fm_rectangle, codec->toUnicode("四角"));
pen_type -> insertItem(fm_paintrectangle, codec->toUnicode("四角"));
pen_type -> insertItem(fm_eraser, codec->toUnicode("消ゴム"));
pen_type -> insertItem(fm_stamp, codec->toUnicode("スタンプ"));
pen_type -> insertItem(fm_range, codec->toUnicode("範囲"));
pen_type -> setGeometry(10,35,145,30);
bar_type = new QComboBox( this );
bar_type -> insertItem(fm_thinline, codec->toUnicode("細線"));
bar_type -> insertItem(fm_normalline, codec->toUnicode("太線"));
bar_type -> insertItem(fm_thickline, codec->toUnicode("極太"));
bar_type -> setGeometry(165,35,145,30);
color = new QPushButton(this);
color -> setText(codec->toUnicode("色"));
color -> setGeometry(320,35,100,30);
bgcolor = new QPushButton(this);
bgcolor -> setText(codec->toUnicode("背景色"));
bgcolor -> setGeometry(430,35,100,30);
bgcolor -> hide(); // 初期設定はペンモードなので背景色ボタンは非表示
erase = new QPushButton(this);
erase -> setText(codec->toUnicode("取消"));
erase -> setGeometry(540,35,90,30);
// メニューバーを画面上に配置
menubar = new QMenuBar( this );
QPopupMenu *m_edit = new QPopupMenu(this); // メニュー項目「m_customize」を作成
m_edit->insertItem( codec->toUnicode("削除"), this, SLOT(slot_delete()) );
m_edit->insertItem( codec->toUnicode("カット"), this, SLOT(slot_cut()) );
m_edit->insertItem( codec->toUnicode("コピー"), this, SLOT(slot_copy()) );
m_edit->insertItem( codec->toUnicode("ペースト"), this, SLOT(slot_paste()) );
m_edit->insertSeparator();
m_edit->insertItem( codec->toUnicode("画像調整"), this, SLOT(slot_adjustment()) );
m_edit->insertItem( codec->toUnicode("減色"), this, SLOT(slot_decrease()) );
m_edit->insertItem( codec->toUnicode("画像効果"), this, SLOT(slot_effect()) );
QPopupMenu *m_menu = new QPopupMenu(this); // メニュー項目「m_menu」を作成
m_menu->insertItem( codec->toUnicode("開く"), this, SLOT(slot_open()) );
m_menu->insertItem( codec->toUnicode("保存"), this, SLOT(slot_save()) );
m_menu->insertSeparator();
m_menu->insertItem( codec->toUnicode("終了"), qApp, SLOT(quit()) );
// メニューバー「menubar」に項目を追加する。ここで追加した順に左から表示される。
menubar->insertItem( codec->toUnicode("メニュー"), m_menu ); // メニューバー「menubar」に「m_menu」を「メニュー」という表示で追加
menubar->insertItem( codec->toUnicode("編集"), m_edit ); // メニューバーに「m_edit」を「編集」という表示で追加
menubar->setSeparator( QMenuBar::InWindowsStyle ); // ウィンドウズみたいなスタイル
// ペンのタイプが変わったときのシグナルの設定
QObject::connect( pen_type, SIGNAL(activated(int)), this, SLOT(slot_setPen()) );
}
// ペンが選択された時の設定
void Mainwindow::slot_setPen()
{
int index = pen_type -> currentItem(); // 現在、コンボボックス「pem_type」で選択している項目の番号
if(index == 0) {
// ペンが選択されている場合
color -> show();
bgcolor -> hide();
bar_type -> show();
bar_type -> clear();
bar_type -> insertItem(fm_thinline, codec->toUnicode("細線"));
bar_type -> insertItem(fm_normalline, codec->toUnicode("太線"));
bar_type -> insertItem(fm_thickline, codec->toUnicode("極太"));
} else if(index == 1) {
// 直線が選択されている場合
color -> show();
bgcolor -> show();
bar_type -> show();
bar_type -> clear();
bar_type -> insertItem(fm_thinline, codec->toUnicode("細線"));
bar_type -> insertItem(fm_normalline, codec->toUnicode("太線"));
bar_type -> insertItem(fm_thickline, codec->toUnicode("極太"));
} else if(index == 2) {
// 直角が選択されている場合
color -> show();
bgcolor -> show();
bar_type -> show();
bar_type -> clear();
bar_type -> insertItem(fm_thinline, codec->toUnicode("細線"));
bar_type -> insertItem(fm_normalline, codec->toUnicode("太線"));
bar_type -> insertItem(fm_thickline, codec->toUnicode("極太"));
} else if(index == 3) {
// 四角(ぬりつぶしなし)が選択されている場合
color -> show();
bgcolor -> show();
bar_type -> show();
bar_type -> clear();
bar_type -> insertItem(fm_thinline, codec->toUnicode("細線"));
bar_type -> insertItem(fm_normalline, codec->toUnicode("太線"));
bar_type -> insertItem(fm_thickline, codec->toUnicode("極太"));
} else if(index == 4) {
// 四角(ぬりつぶしあり)が選択されている場合
color -> show();
bgcolor -> show();
bar_type -> show();
bar_type -> clear();
bar_type -> insertItem(fm_paint, codec->toUnicode("ベタ"));
} else if(index == 5) {
// 消ゴムが選択されている場合
color -> hide();
bgcolor -> hide();
bar_type -> show();
bar_type -> clear();
bar_type -> insertItem(fm_minieraser, codec->toUnicode("細"));
bar_type -> insertItem(fm_eraser, codec->toUnicode("太"));
} else if(index == 6) {
// スタンプが選択されている場合
color -> hide();
bgcolor -> hide();
bar_type -> hide();
} else if(index == 7) {
// 範囲が選択されている場合
color -> hide();
bgcolor -> hide();
bar_type -> show();
bar_type -> clear();
bar_type -> insertItem(codec->toUnicode("削除"));
bar_type -> insertItem(codec->toUnicode("カット"));
bar_type -> insertItem(codec->toUnicode("コピー"));
bar_type -> insertItem(codec->toUnicode("ペースト"));
bar_type -> insertItem(codec->toUnicode("左回転"));
bar_type -> insertItem(codec->toUnicode("右回転"));
bar_type -> insertItem(codec->toUnicode("上下反転"));
bar_type -> insertItem(codec->toUnicode("左右反転"));
bar_type -> insertItem(codec->toUnicode("文字入力"));
}
}
|
. ~/SLZaurus/bin/dev-arm-qpe.sh cd ~/SLZaurus/sample0011 progen -o sample0011.pro tmake -o Makefile sample0011.pro make |